راهاندازی وردپرس در محیط محلی با WampServer یکی از مراحل اولیه توسعه وردپرس است. با این حال، محدودیتهای پیشفرض PHP ممکن است در هنگام نصب افزونهها یا اجرای برخی عملیات مشکل ایجاد کند. در این مقاله، نحوه افزایش منابع وردپرس در WampServer را بررسی میکنم تا محیط محلی شما عملکرد بهتری داشته باشد.
فهرست مطالب
کدام منابع وردپرس را در WampServer افزایش دهیم
شما میتوانید برخی منابع را برای وردپرس در WAMP افزایش دهید تا عملکرد بهتری داشته باشید یا از دست محدودیتها خلاص شوید:
- Maximum Execution Time
- Maximum Input Time
- Maximum Input Vars
- PHP Memory Limit
- Post Max Size
- File Upload Size
نحوه افزایش منابع وردپرس در WampServer
روش و مسیر برای همه چیز یکسان است. ما این کار را با تغییر تنظیمات PHP انجام میدهیم. اگر رایانه شما منابع کافی دارد، میتوانید آنها را به حداکثر مقدار قابل انتخاب تغییر دهید.
- ابتدا، با کلیک روی آیکون WampServer در منوی استارت، آن را اجرا کنید.
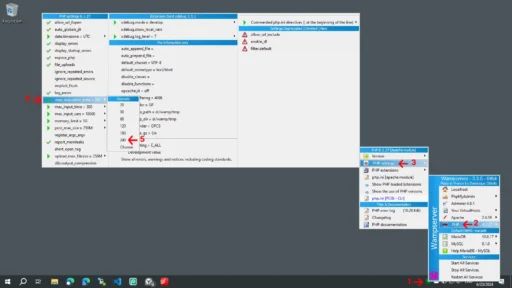
- سپس، روی آیکون WAMP در نوار وظیفه ویندوز (پایین سمت راست، در قسمت اعلانات) کلیک کنید.
- سپس، ماوس را روی PHP و سپس روی PHP settings ببرید.
- پس از آن، از پایین سمت چپ، میتوانید ۶ گزینه با یک علامت سبز در سمت راست را ببینید.
- حالا، ماوس را یکی یکی روی آنها ببرید و مقدارشان را افزایش دهید. همانطور که در تصویر زیر میبینید، من قبلا همه چیز را به بالاترین مقدار قابل انتخاب تغییر دادهام.

سرویسهای WampServer را پس از تغییرات فوق مجدد راهاندازی کنید
پس از انجام تغییرات فوق، برای اعمال تنظیمات جدید، باید سرویسهای WampServer را مجدد راهاندازی کنید.
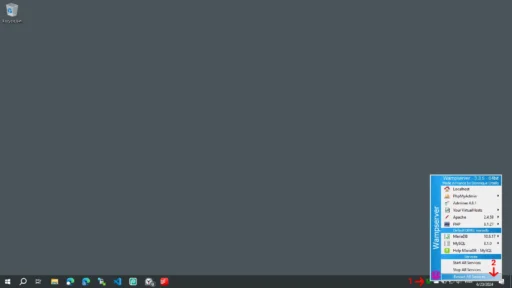
- روی آیکون WampServer در نوار وظیفه ویندوز (پایین سمت راست، در قسمت اعلانات) کلیک کنید.
- روی Restart All Services کلیک کنید.

نتیجه را در داشبورد وردپرس دوباره بررسی کنید
وقت آن است که بررسی کنیم آیا همه تغییرات به درستی تنظیم شدهاند یا خیر.
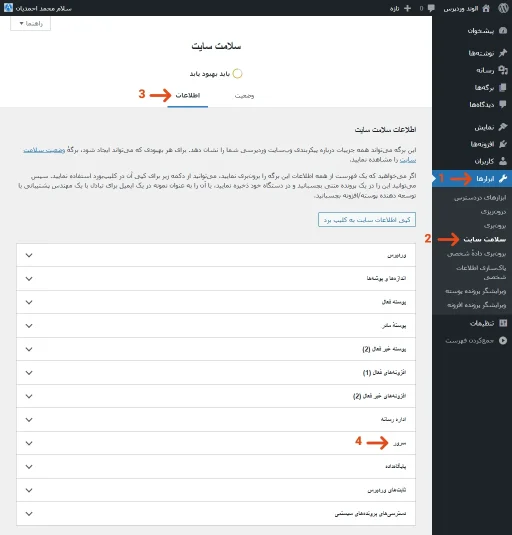
- وارد داشبورد مدیریت وردپرس خود شوید.
- روی ابزارها > سلامت سایت > اطلاعات کلیک کنید.
- مطمئن شوید که تغییرات در بخش سرور اعمال شدند.

نتیجهگیری
با افزایش منابع وردپرس در WampServer، میتوان بسیاری از محدودیتهای رایج در محیط محلی را برطرف کرد. انجام این تنظیمات به شما کمک میکند وردپرس را در شرایطی نزدیکتر به سرور واقعی اجرا کنید. در نتیجه، فرایند توسعه، تست و خطایابی سایت سادهتر و پایدارتر خواهد بود.
تمام قسمتهای این مجموعه

دیدگاهتان را بنویسید