وردپرس، یکی از محبوبترین سیستمهای مدیریت محتوا (CMS) در سطح جهان، طیف گستردهای از افزونهها را برای بهبود عملکرد وبسایت شما ارائه میدهد. چه نیاز به بهبود سئو، اضافه کردن فرمهای تماس یا ادغام رسانههای اجتماعی داشته باشید، افزونهها راهحل اصلی هستند. در این مقاله وبلاگ، شما را در نصب افزونه وردپرس راهنمایی میکنم که به شما امکان میدهد وبسایت خود را سفارشی کنید و امکانات جدیدی را باز کنید.
فهرست مطالب
- مرحله اول: انتخاب افزونه وردپرس مناسب
- مرحله دوم: دانلود افزونه وردپرس
- مرحله سوم: دسترسی به پیشخوان وردپرس
- مرحله چهارم: به بخش افزونهها بروید
- مرحله پنجم: روی دکمه بارگذاری افزونه کلیک کنید
- مرحله ششم: فایل افزونه را انتخاب کنید
- مرحله هفتم: نصب افزونه وردپرس
- مرحله هشتم: فعالسازی افزونه
- مرحله نهم: پیکربندی بعد از نصب افزونه وردپرس
- نتیجهگیری
مرحله اول: انتخاب افزونه وردپرس مناسب
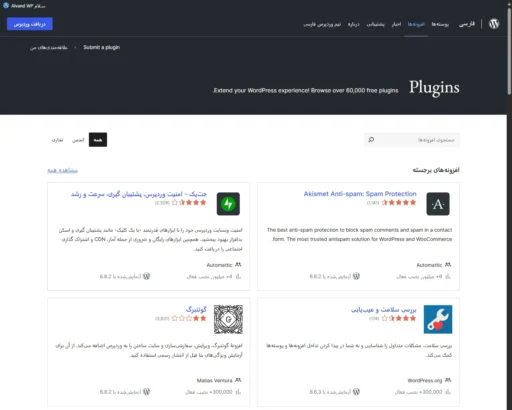
انتخاب افزونه مناسب برای نیازهای خاص شما ضروری است. میتوانید مخزن افزونههای وردپرس یا سایر بازارهای معتبر را برای یافتن افزونه مناسب جستجو کنید. خواندن نظرات، بررسی رتبهبندیها و اطمینان از سازگاری افزونه با نسخه فعلی وردپرس و PHP خود را در نظر بگیرید. میتوانید مقاله 10 افزونه برای تقویت سریع وبسایت وردپرس را برای یافتن برخی از افزونههای ضروری مطالعه کنید.
مرحله دوم: دانلود افزونه وردپرس
پس از شناسایی افزونه مورد نظر، آن را روی رایانه خود دانلود کنید. اکثر افزونهها به صورت فایل زیپ (zip) در دسترس هستند. فایل دانلود شده را در مکانی که به راحتی قابل دسترسی باشد، نگه دارید.
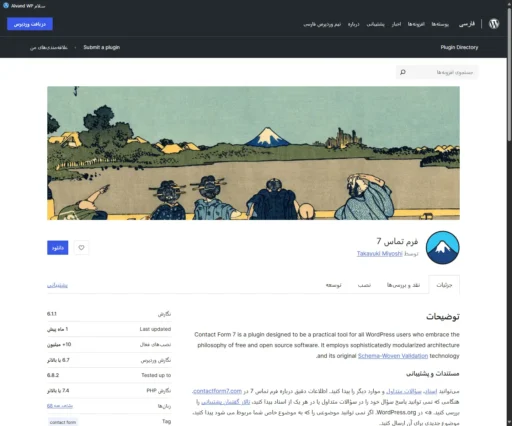
ابتدا، روی عنوان افزونه در مخزن افزونههای وردپرس به زبان فارسی کلیک کنید. سپس روی دکمه دانلود کلیک کنید. پس از آن، مکانی را برای ذخیره فایل دانلود شده انتخاب کنید.
مرحله سوم: دسترسی به پیشخوان وردپرس
برای ادامه نصب، به پیشخوان وردپرس خود وارد شوید. معمولاً میتوانید با اضافه کردن wp-admin به انتهای آدرس وبسایت خود (مثلاً yourwebsite.com/wp-admin) به آن دسترسی پیدا کنید.
اگر مشکل دارید یا اطلاعات بیشتری میخواهید، به مقاله نحوه ورود به پیشخوان مدیریت وردپرس مراجعه کنید.
مرحله چهارم: به بخش افزونهها بروید
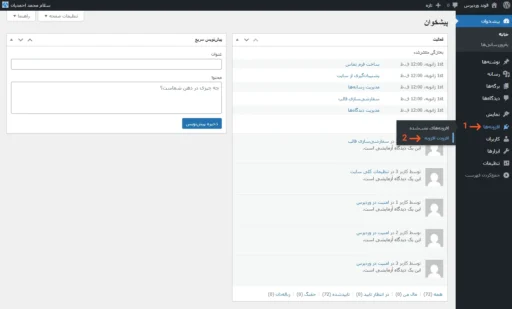
پس از ورود موفقیتآمیز، به پیشخوان وردپرس هدایت خواهید شد. در منوی سمت راست، به دنبال گزینه افزونهها بگردید و اشارهگر ماوس را روی آن ببرید. سپس گزینه افزودن افزونه را انتخاب کنید.
مرحله پنجم: روی دکمه بارگذاری افزونه کلیک کنید
رابط کاربری افزودن افزونه گزینههای مختلفی برای نصب را ارائه میکند. دکمه بارگذاری افزونه را در بالای صفحه پیدا کنید و روی آن کلیک کنید.

مرحله ششم: فایل افزونه را انتخاب کنید
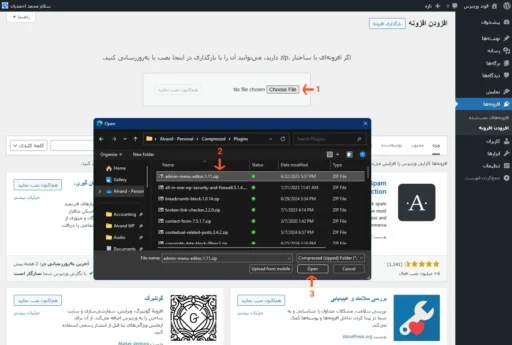
پس از کلیک روی دکمه بارگذاری افزونه، فرمی برای بارگذاری فایل دریافت خواهید کرد. برای باز کردن پنجرهی مرورگر فایل در رایانهتان، روی دکمه انتخاب فایل کلیک کنید. به جایی که فایل افزونه را ذخیره کردهاید بروید، آن را انتخاب کنید و روی دکمه Open (باز کردن) کلیک کنید.
مرحله هفتم: نصب افزونه وردپرس
پس از انتخاب فایل افزونه، به رابط افزودن افزونه در پیشخوان وردپرس خود هدایت میشوید. مسیر و نام فایل نمایش داده شده در فرم بارگذاری فایل را بررسی کنید تا از صحت آن اطمینان حاصل کنید. در نهایت، برای نصب افزونه، روی دکمه هماکنون نصب نمایید کلیک کنید.

مرحله هشتم: فعالسازی افزونه
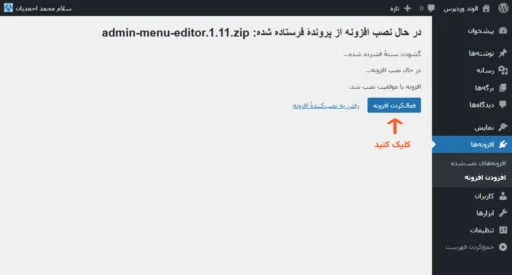
پس از اتمام نصب افزونه، به یک صفحه با پیام موفقیتآمیز هدایت میشوید (اگر همه چیز خوب پیش برود). برای شروع استفاده از افزونه، روی دکمه فعال کردن افزونه کلیک کنید. پس از فعالسازی، افزونه در وبسایت وردپرس شما فعال خواهد شد.
مرحله نهم: پیکربندی بعد از نصب افزونه وردپرس
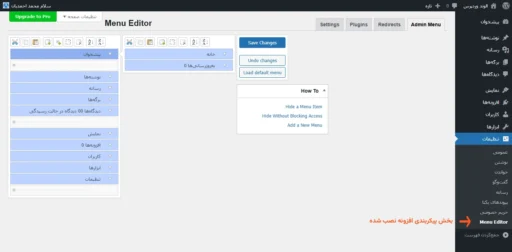
پس از فعالسازی افزونه، ممکن است لازم باشد تنظیمات آن را مطابق با نیازهای خود پیکربندی کنید. به صفحه تنظیمات اختصاصی افزونه (در صورت وجود) که از منوی سمت راست پیشخوان وردپرس قابل دسترسی است بروید. گزینههای موجود را بررسی کرده و آنها را متناسب با نیازهای خود سفارشی کنید.
نتیجهگیری
افزونههای وردپرس ابزارهای ارزشمندی برای افزایش کارایی و ویژگیهای وبسایت شما هستند. با دنبال کردن این چند مرحله، میتوانید به راحتی یک افزونه وردپرس را نصب و فعال کنید و دری به دنیایی از امکانات باز کنید. به یاد داشته باشید که افزونههای معتبر را انتخاب کنید، آنها را بهروز نگه دارید و مرتب عملکرد آنها را بررسی کنید تا از یک تجربه وبسایت بینقص اطمینان حاصل کنید. از کاوش در مجموعه گسترده افزونههای موجود لذت ببرید و وبسایت وردپرس خود را با قابلیتهای اضافه توانمند کنید!

دیدگاهتان را بنویسید