فرمت WebP یکی از قالبهای جدید تصویر است که حجم کمتر و کیفیت مناسبتری نسبت به JPEG و PNG ارائه میدهد. وردپرس بهصورت پیشفرض از این فرمت پشتیبانی میکند، اما در محیط محلی مانند XAMPP ممکن است هنگام آپلود با خطا مواجه شوید. این مشکل معمولاً به تنظیمات PHP مربوط است. در این مقاله، مراحل فعال کردن آپلود تصاویر WebP در XAMPP برای وردپرس را بهصورت ساده و گامبهگام بررسی میکنم. اگر میخواهید تصویری با فرمت webp به کتابخانه اضافه کنید، ابتدا باید این کارها را انجام دهید. در غیر این صورت، خطای زیر را مشاهده خواهید کرد:
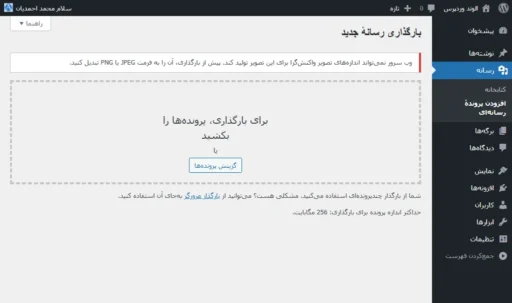
وب سرور نمیتواند اندازههای تصویر واکنشگرا برای این تصویر تولید کند. پیش از بارگذاری، آن را به فرمت JPEG یا PNG تبدیل کنید.
تصویر گرفته شده از بخش مدیریت وردپرس را ببینید:
فعال کردن آپلود تصاویر WebP در XAMPP
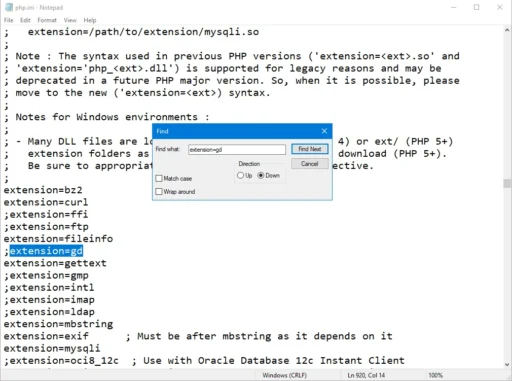
قبل از آپلود یک تصویر با فرمت webp، باید کتابخانه GD را در PHP فعال کنید. بنابراین مراحل زیر را برای فعال کردن آن دنبال کنید:
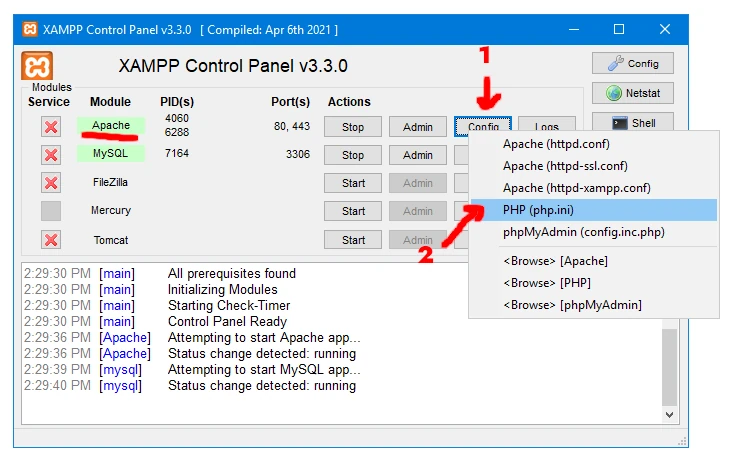
- کنترل پنل XAMPP را باز کنید.
- در مقابل Apache، روی Config کلیک کنید و PHP (php.ini) را انتخاب کنید.
- عبارت extension=gd را جستجو کنید و علامت نقطه ویرگول ” ; ” قبل از آن را حذف کنید تا از حالت کامنت خارج شود.
- فایل را ذخیره کنید و آن را ببندید.
- Apache و MySQL را در کنترل پنل XAMPP متوقف و دوباره اجرا کنید.
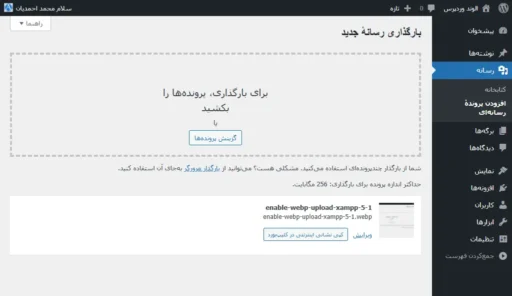
نتیجه را ببینید
شما با موفقیت آپلود تصویر webp را فعال کردید. همانطور که در زیر میبینید، حالا میتوانید تصویر مذکور را در بخش رسانه وردپرس آپلود کنید:
نتیجهگیری
با فعالسازی کتابخانه GD در PHP، امکان آپلود تصاویر WebP در وردپرس روی XAMPP بدون خطا فراهم میشود. این تنظیم ساده باعث میشود محیط توسعه محلی رفتار مشابهتری با میزبان اصلی داشته باشد. در نتیجه، میتوانید تصاویر مدرن را بدون محدودیت آزمایش و استفاده کنید. این کار به بهبود روند توسعه و بررسی عملکرد سایت کمک میکند.


دیدگاهتان را بنویسید