برونبری پوسته بلوکی وردپرس یا همان Export آن، برای ذخیره کردن سفارشیسازیها, انتقال پوسته به یک سایت دیگر یا به اشتراک گذاشتن آن با دیگران ضروری است. بدون یک فرآیند برونبری مناسب، ممکن است تغییرات اساسی را از دست بدهید. بنابراین استفاده ابزارهای مناسب برای مدیریت موثر پوسته ضروری است. در این راهنما دو روش کلیدی را پوشش میدهیم. این مراحل تضمین میکنند که پوسته شما مرتب و قابل انتقال باقی میماند.
فهرست مطالب
برونبری پوسته بلوکی وردپرس با استفاده از ویرایشگر سایت
ویرایشگر سایت به شما اجازه میدهد بدون اصلاح مستقیم پروندهها، پوستههای بلوکی را سفارشی کنید. در عوض وردپرس، تغییرات را در پایگاهداده ذخیره میکند. با این حال، اگر میخواهید تغییرات خود را برای همیشه حفظ کنید، باید پوسته را برونبری کنید.
مراحل برونبری پوسته بلوکی وردپرس
- باز کردن ویرایشگر سایت
- در پیشخوان وردپرس، از فهرست کناری به سراغ نمایش > ویرایشگر بروید.
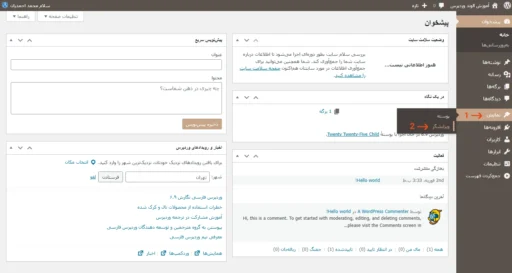
- سفارشیسازی کردن
- سپس قالبها، قسمتهای قالب، شیوهنامهها و غیره را براساس نیازهای خود تغییر دهید.
- برونبری پوسته
- حالا، در ویرایشگر سایت یک قالب یا قسمت قالب دلخواه انتخاب شود.
- بعد، روی آیکن سه نقطه در گوشه سمت چپ در بالای ویرایشگر کلیک کنید.
- پس از آن، برای دانلود پوسته به صورت یک فایل زیپ، برونبری را انتخاب نمایید.

- ذخیره کردن پوسته برونبر شده
- صبر کنید پیام دانلود در مرورگر یا برنامه مخصوص دانلود شما باز شود.
- در نهایت، فایل زیپ را در یک مکان امن ذخیره کنید.
به این شکل میتوانید از پوسته استفاده مجدد کنید و یا بعدا آن را به اشتراک بگذارید.
استفاده از افزونه Create Block Theme برای برونبری پوسته
افزونه Create Block Theme راهی پیشرفتهتر برای برونبری و ذخیره پوستههای بلوکی وردپرس ارائه میدهد. این افزونه شامل ویژگی ذخیره تغییرات در پوسته است که میتواند تغییرات شما را مستقیما در فایلهای پوسته اعمال کرده و تغییرات دائمی میشوند. استفاده از این گزینه در محیط توسعه محلی با امکاناتی برای ثبت و دنبال کردن تغییرات مناسب است. این ویژگی و برخی موارد دیگر، بیشتر برای توسعهدهندگان وردپرس کاربرد دارد و موضوع این مقاله نیست. در نظر داشته باشید که تا این تاریخ، افزونه مذکور به فارسی ترجمه نشده است.
مراحل برونبری پوسته با استفاده از افزونه
- نصب افزونه
- برای شروع، به افزونهها > افزودن افزونه در پیشخوان مدیریت وردپرس بروید.
- سپس به دنبال افزونه Create Block Theme بگردید و روی هماکنون نصب نمایید کلیک کنید.
- زمانی که نصب شد، روی فعالکردن افزونه کلیک کنید.
- سفارشیسازی پوسته
- قبل از برونبری، دقت کنید که تمام تغییرات لازم را با استفاده از ویرایشگر سایت انجام دادهاید.
- ذخیره پوسته
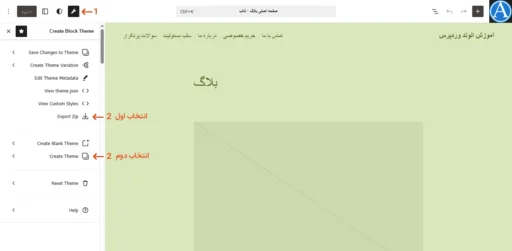
- بعد، روی آیکون افزونه که در گوشه چپ بالای ویرایشگر سایت اضافه شده کلیک کنید.
- گزینه اول این است که روی Export Zip کلیک کرده و پوسته را دانلود کنید.
- گزینه دوم این است که روی Create Theme کلیک نمایید. بعد Create Child Theme را انتخاب کنید. در نتیجه یک پوسته فرزند برای پوسته فعلی ایجاد میشود. پوسته والد بدون تغییر باقی میماند و تغییرات کاربر در پوسته فرزند ذخیره خواهد شد. بعد از کلیک روی این گزینه، پوسته فرزند به طور خودکار فعال خواهد شد.
- بعد، روی آیکون افزونه که در گوشه چپ بالای ویرایشگر سایت اضافه شده کلیک کنید.
نتیجهگیری
برونبری پوسته بلوکی وردپرس بسیار مهم است. به خصوص اگر میخواهید یک جریان کار قابلاعتماد را حفظ کنید. بدون یک فرآیند ساختاری، ریسک از دست دادن سفارشیسازیهای مهم را دارید. بنابراین استفاده از ابزارهای مناسب ضروری است. با ترکیب این روشها، میتوانید به طور موثر پوسته خود را مدیریت کنید. چه بر روی پروژههای شخصی کار کنید و چه در حال توسعه پوستههایی برای فروش باشید، این مراحل به شما کمک خواهد کرد تا سازماندهی شوید و از مشکلات غیرضروری اجتناب کنید.

دیدگاهتان را بنویسید